开源项目:【自动】绘图工具 Graphviz——《太子党关系网络》就是用它制作
★先插播一个安全通告
一星期前(2月16日)曝光了一个高危漏洞。该漏洞存在于广泛使用的 glibc(GNU C Library)。Linux 和 BSD 上面有非常多的软件依赖了这个库。而且出漏洞的函数是 getaddrinfo——该函数被很多软件(比如:各种脚本语言引擎、SSH、cURL ......)用于 DNS 相关的功能。
这个漏洞是可以被远程利用的。攻击者可以通过好几种方式来利用该漏洞,俺认为可能性比较大的方式是“中间人攻击”。具体的技术细节就不多谈了,感兴趣的同学可以参见 Google 官方的安全博客(链接在“这里”)。
值得一提的是:
这个高危漏洞,又是 Google 的研究人员披露的。为啥俺要说【又】?因为最近几年,已经有好多个影响很广泛的高危漏洞是 Google 安全研究团队曝光的(还记得前些年那个“心脏出血”漏洞吗)。所以,俺把博客架设在 Google 的 Blogspot 平台上还是比较放心的。虽然 Blogspot 博客平台在全球博客市场排名老二,但是份额最大的 Wordpress 平台,出了太多的安全漏洞,令人实在不敢恭维——据说前几天 Linux Mint 官网被入侵,就是因为 WordPress 的漏洞。
当某个高危漏洞曝光之后,到相关软件提供补丁,这中间有一个很危险的窗口期。
由于俺是高危险人士,所以前几天先保持静默——暂不使用“编程随想”这个身份进行网络活动。
★引子
前段时间俺承诺把《太子党关系网络》开源到俺的 GitHub 帐号下。
对这个项目而言,“开源”只是一种手段而不是目的,开源的目的是:让更多人能够参与到其中,一起曝光天朝的权贵。
为了更好的达成此目的,今天发一篇博文,扫盲一下 Graphviz 这个牛B的绘图工具。俺制作的《太子党关系网络》就是用它来【自动】生成各种复杂的网状关系图。
★Graphviz 是啥?
Graphviz 是洋文“Graph Visualization”的缩略词,是一个开源的,跨平台的自动绘图工具,其官网在“这里”,维基百科的介绍在“这里”。
这玩意儿诞生于上个世纪末,来自 AT&T 的实验室,属于名门正派出身。十多年来,它已经被广泛使用于各个领域。其 Mac OS 版本甚至还获得了2004年的苹果设计奖。
Graphviz 不但是开源软件,而且是自由软件。使用它完全【无需】付费,也【没有】任何注册码之类的恶心东西。
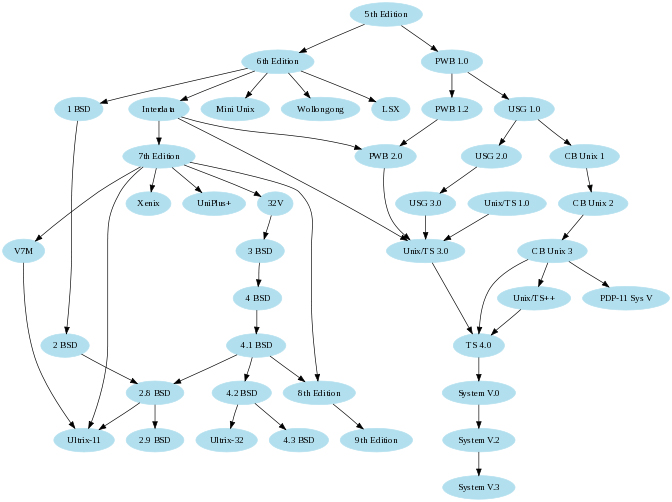
(下图是 UNIX 操作系统的全家福,基于 Graphviz 绘制)
★Graphviz 能干啥?
“绘图工具”有很多种,Graphviz 主要是用来绘制【关系图】。所以它更类似于微软的 Visio。但是它与 Visio 有一个【本质上】的差异:
用 Visio 画图是【手动】的——你需要动用你的肉眼和手指头。
而用 Graphviz 画图是【自动】的——你只需要告诉 Graphviz 这张图包含哪些元素,元素之间有啥关系,然后 Graphviz 可以【自动】帮你画出来。
那么,你如何告诉 Graphviz 你要画的图形包含哪些元素捏?这就需要用到一个名叫 DOT 的描述语言(待会儿俺会简单介绍 DOT 语言)。
★为啥用 Graphviz 而不用 Visio 或类似的工具?
客观地讲,Graphviz 和 Visio 之类的工具,各有各的特长。因为本文介绍的是 Graphviz,所以下面聊一下:哪些场景是 Graphviz 胜过 Visio 类工具的。
简而言之,Graphviz 胜过 Visio 这类工具的关键在于【自动布局】。如果你要绘制的关系图非常复杂,这时候【手动】布局就变得极其繁琐。而 Graphviz 的自动布局功能,再复杂的关系图,也可以自动搞定。
请看下面几个例子(都是用 Graphviz 自动绘制的)
下图是美国本土48个州的比邻关系(不含2个海外的州)

而 Graphviz 的自动布局功能,无需人为干预就可以做到“最小化连线交叉”。
下图是俺整理的《太子党关系网络》其中一幅图(原图太大,缩小4倍之后裁剪其中一部分)

如果你想看更复杂的关系图,可以去 Graphviz 官网。那上面收集了一些超级复杂的关系图(链接在“这里”)。
★Graphviz 软件的使用
◇下载、安装
对于用 Windows 的同学,直接上官网的这个页面,可以下载到 Windows 的二进制软件包;
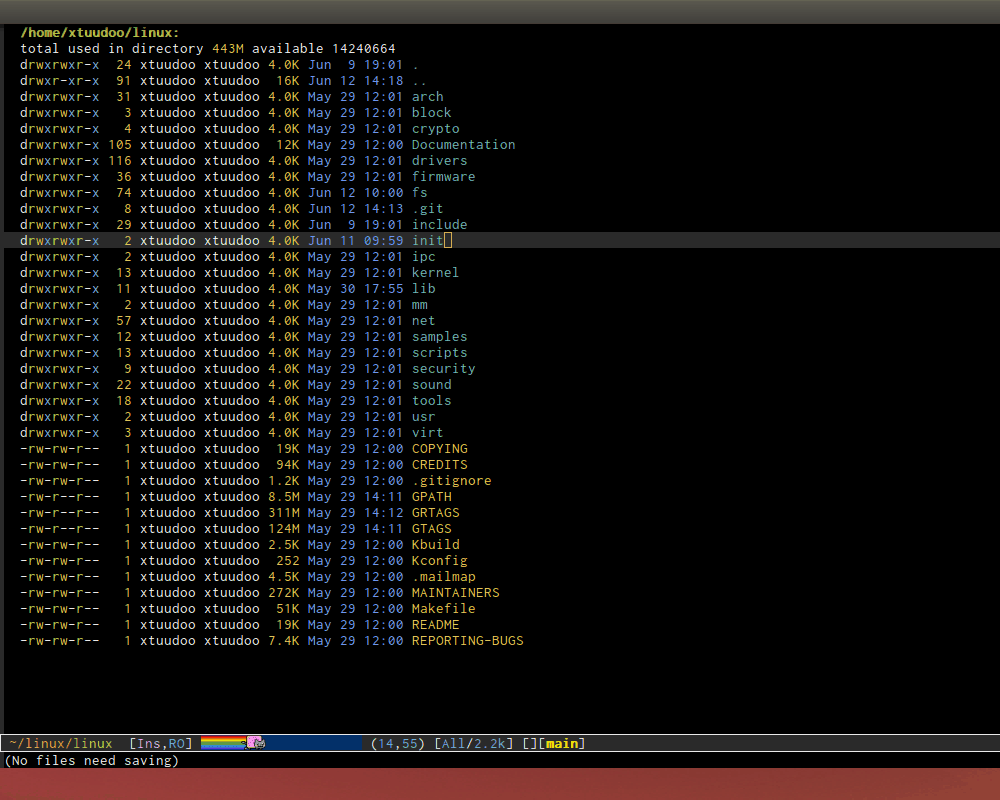
对于用 Linux 的同学,主流的发行版的“软件仓库”应该都包含了 graphviz,你只需用发行版内置的软件包管理器,就可以把 graphviz 装好;
对于用 Mac OS 的同学,到官网的“这个页面”下载软件包。
◇DOT 命令行的使用
(如果你从来没有用过命令行,建议先了解“命令行”相关的基本概念,再来本看小节)
假设你已经用 DOT 语言写好了一个关系图的描述文件,假设这个文件名是 test.gv 那么你可以进入 test.gv 所在的目录,然后用如下命令生成【png图片】
dot -Tpng -O test.gv对于 Windows 用户的说明:
你可以把 graphviz 安装目录下的 bin 目录设置到 PATH 环境变量中,就可以在命令行中直接使用 dot 命令。否则的话,你需要用【全路径】方式来启动 dot 命令。
◇支持的输出格式
上述命令行中的 -Tpng 表示生成的文件类型是png图片。如果你需要生成其它格式,也可以。目前 Graphviz 支持很多种格式,
图片格式【至少】支持:png、jpg、gif、bmp、tiff、ico、svg
文档格式【至少】支持:pdf、ps/eps
完全的输出格式说明参见官网这个页面。
◇关于扩展名的说明
DOT 的描述文件有好几种扩展名,用得比较多的就是 .dot
但是这个扩展名与微软的 Word 模板的扩展名冲突了。所以俺在本文的示例,用的都是 .gv 这个扩展名。
★DOT 语言入门
◇概述
前面提到,你需要通过 DOT 语言来描述一个关系图,然后 Graphviz 根据这个 DOT 语言的描述来自动生成图形。
很多读者一听到“语言”就先望而生畏,其实这个 DOT 并不复杂。从原则上讲,它只描述三种东西,分别是:点(node)、线(edge)、图形(graph)。你可以通过 DOT 语言定义这三种东西的属性(比如:颜色、形状)。
◇两种图:有向图(digraph) VS 无向图(graph)
DOT 语言支持两种图形,分别是“有向图 和 无向图”。通俗地说,“有向图”里面的连线是有箭头(比如前面给出的那张“太子党关系图”);反之,“无向图”里面的连线是没有箭头的,比如前面那张“48州的比邻关系图”。
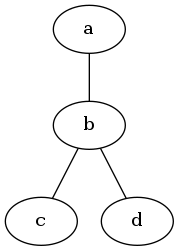
定义一个无向图很简单,先看下面这段代码。
graph simple
{
    a -- b -- c;
    b -- d;
}
// 这是个无向图
上述代码的效果图如下:
要定义一个有向图,也很简单,代码如下:
digraph simple
{
    a -> b -> c;
    b -> d;
}
/* 这是个有向图 */
上述代码的效果图如下:

这2段代码中,graph 用来表示一个无向图;digraph 用来表示一个有向图。
示例中的 simple 表示图的名称。图的名称可以是【英文字母、下划线、数字、中文】。最好【不要包含】其它英文的标点符号(也就是【半角符号】),可能会导致一些语法错误。但是中文标点符号(也就【全角符号】)没有关系。
花括号/大括号 里面的语句表示【图的定义】——这张图包含哪些内容。每一条语句以【分号】结尾(类似于 C、C++、Java 的语法)。
顺便提一下 DOT 语言的注释(其注释的语法与 C、C++、Java 类似),包括如下两种:
【单行注释】——以 // 表示:【该行】后续的内容为注释
【多行注释】——以 /* 和 */ 包含起来的内容为注释
◇节点(node)
通过上面两个例子,你应该已经获得了感性的认识。OK,下面来讨论“节点”(node)的概念。
在上面两个例子中, a b c d 都是【节点名】,分别代表节点。在图的定义中,相同名称就代表同一个节点。当 DOT 编译器碰到一个新的名称,就认为这是一个新的节点。
节点的命名规范类似于图的命名规范,此次不再罗嗦。如果某个节点没有设置 label 属性(关于【属性】,下面会聊到),那么图形中就用节点名作为该节点的标题——就好比前面两幅简单的示意图。
◇节点(node)的属性
在节点名之后可以使用 方括号/中括号 来定义该节点的属性,属性之间用半角逗号分隔。
属性的定义采用如下形式:
属性名 半角等于号 属性值(如果属性值会包含空格,需用引号把属性值引用起来)
常用的【属性名】包括如下:
label——标题(还有更多属性,可以参见官网“这个链接”)
color——颜色
style——样式
shape——形状
给一个示例代码及效果图,你一看就明白了:
digraph node_attr
{
    shape1 [shape=box, label="编程随想注:\n矩形节点"];
    shape2 [shape=circle, label="编程随想注:\n圆形节点"];
    shape3 [shape=ellipse, label="编程随想注:\n椭圆形节点"];
    shape4 [shape=polygon, sides=4, skew=0.4, label="编程随想注:\n平行四边形节点"];
    shape5 [shape=none, label="编程随想注:\n无边框节点"];
    shape1 -> shape2 -> shape3 -> shape4 -> shape5

    color1 [color="blue", label="编程随想注:\n蓝色边框"]
    color2 [color="green", style=filled, label="编程随想注:\n绿色填充"]
    color3 [color="#ff0000", style=filled, fillcolor="yellow", label="编程随想注:\n红色边框+黄色填充"]
    color4 [color="#0000FF" style=filled, fillcolor="green:red", label="编程随想注:\n蓝色边框+从绿色到红色渐变填充"]
    /* 上面两个节点采用 HTML 的颜色语法,dot 支持 这种语法 */
    color1 -> color2 -> color3 -> color4

    text1 [shape=box, fontsize=12, label="编程随想注:\n小字体"]
    text2 [shape=box, fontsize=24, label="编程随想注:\n大字体"]
    text3 [shape=box, fontcolor="blue", label="编程随想注:\n蓝色文字"]
    text4 [shape=box, label=<编程随想注:<br/><b>粗体</b> <i>斜体</i> <u>下划线</u>>]
    // 注意:text4 使用 HTML 风格的 label,无需引号,但必须用尖括号
    text1 -> text2 -> text3 -> text4
}

补充说明:
在上述示例,俺刻意用到了 HTML 的颜色语法。关于这种语法的说明可以参见维基百科的这个链接。
◇连线(edge)
聊完【节点/node】,再来聊【连线/edge】。
如前面所示,无向图的连线用 -- 表示,有向图的连线用 -> 表示,非常形象。定义连线的语句也是以分号结尾。
连线与节点的关键差异之处在于——节点有名称而【连线没有名称】。
◇连线(edge)的属性
连线也可以设置属性,其属性写在定义连线的语句末尾,语法类似节点属性。
常用的【属性名】包括如下:
label——标题(还有更多属性,可以参见官网“这个链接”)
color——颜色
style——线条的样式
dir——连线的方向(仅用于有向图,可设置:正向箭头、反向箭头、双向箭头)
arrowhead——前端的样式
arrowtail——末端的样式
下面给几个示例,你自己去揣摩(以【有向图】作示范)
digraph edge_attr
{
    style0[label="编程随想注:\n以下是样式的示例"];
    style1[label=""] style2[label=""] style3[label=""] style4[label=""];

    style0 -> style1 [style=solid, label="实线"];
    style1 -> style2 [style=bold, label="粗线"];
    style2 -> style3 [style=dashed, label="短划线"];
    style3 -> style4 [style=dotted, label="虚线"];

    arrow0[label="编程随想注:\n以下是箭头的示例"];
    arrow1[label=""] arrow2[label=""] arrow3[label=""] arrow4[label=""] arrow5[label=""] arrow6[label=""];
    arrow0 -> arrow1 [dir=both, label="双向箭头"];
    arrow1 -> arrow2 [arrowsize=2.0, label="大箭头"];
    arrow2 -> arrow3 [arrowhead="open", label="带倒钩的箭头"];
    arrow3 -> arrow4 [arrowhead="halfopen", label="单边倒钩"];
    arrow4 -> arrow5 [arrowhead="ediamond", label="菱形箭头"];
    arrow5 -> arrow6 [arrowhead="dot", label="圆形箭头"];

    color0[label="编程随想注:\n以下是颜色的示例"];
    color1[label=""] color2[label=""] color3[label=""];
    color0 -> color1 [color="blue", label="蓝色"];
    color1 -> color2 [color="red:blue", label="双色"];
    color2 -> color3 [color="green:red;0.4:blue", label="颜色分段"];
}

◇图的属性
说完了“节点”和“连线”,最后稍微聊一下“图”本身的属性。
常用的【属性名】包括如下:
label——标题(还有更多属性,可以参见官网“这个链接”)
bgcolor——颜色
fontname——字体名称(【不】影响节点和连线)
fontsize——字体大小(【不】影响节点和连线)
fontcolor——字体颜色(【不】影响节点和连线)
center——是否居中绘制
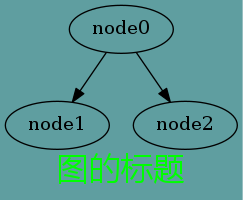
digraph graph_attr
{
    graph[bgcolor="cadetblue" label="图的标题" fontsize=24 fontcolor="green"];

    node0 -> node1;
    node0 -> node2;
}
◇进阶
前面俺讲的都是 DOT 最基本的概念和使用。DOT 语言还有一些更高级的用法,感兴趣的同学可以参考下一个章节(★相关资源)给出的“dotguide.pdf”。
★相关资源
◇官网的资源
以下是官网上的若干在线文档:
http://www.graphviz.org/doc/Dot.ref
http://www.graphviz.org/doc/info/attrs.html
http://www.graphviz.org/doc/info/shapes.html
http://www.graphviz.org/doc/info/arrows.html
http://www.graphviz.org/doc/info/colors.html
官方提供的 DOT 语言完整的指南(pdf)
Graphviz 官方的 GitHub 帐号
◇编辑器
自带的编辑器
Graphviz 软件包中自带了 gvedit 和 vimdot。
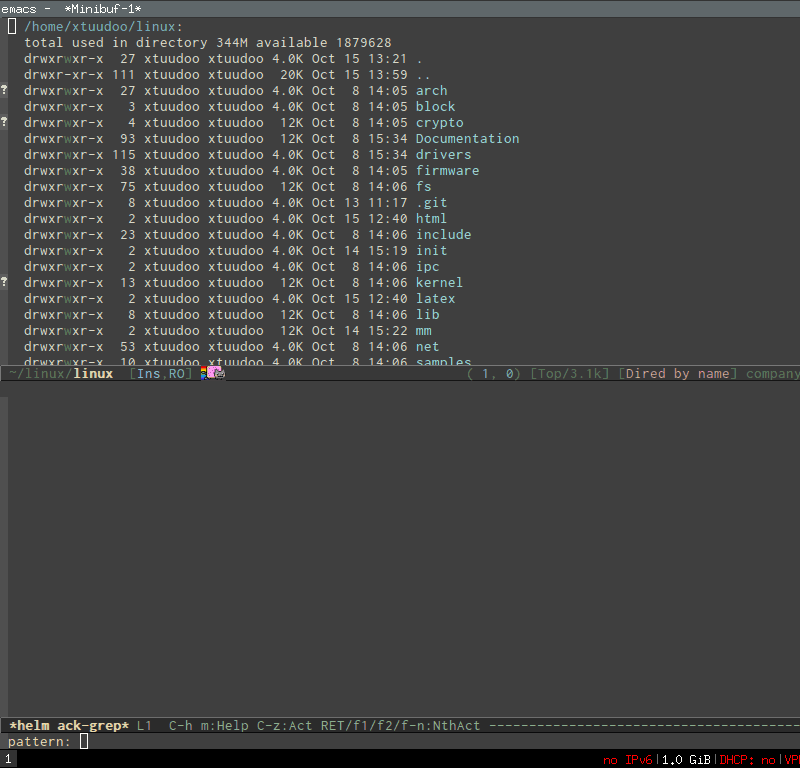
Emacs 的 mode
https://github.com/ppareit/graphviz-dot-mode
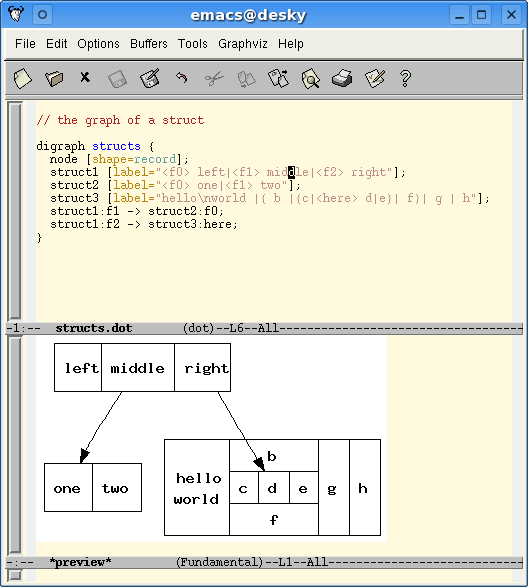
俺平时用这个 mode 来编辑 dot 数据文件。它可以实现“所见即所得”——每次修改完,直接在 Emacs 另一个窗口预览图片。
其作者提供的效果图如下:
VI/VIM 的插件
https://github.com/wannesm/wmgraphviz.vim
◇编程语言的整合
JavaScript
https://github.com/mdaines/viz.js
https://github.com/gyuque/livizjs
Python
https://pypi.python.org/pypi/graphviz
Ruby
https://github.com/glejeune/Ruby-Graphviz
Java
http://jgraphviz.sourceforge.net/


 The articles on this site come from Internet, thanks to all the original authors.